JBake Blog with Maven Plugin
21 January 2020
- Summary
-
When I decided to start blogging, the combination of Github pages and JBake looked most promising to me: Out-of-the-box support of Asciidoc, Java application should be friendly for me as Java developer, one of the most popular static site generators, etc.<p> There are many articles and blog posts about the combination of JBake and Gradle. But because I'm much more familiar with Maven and Maven tooling was already installed on my Notebook, I decided to try the JBake's Maven plugin for stetting up the static Blog site.
Preparation
Java
As of the time of writing, with Java runtime 11 or higher JBake (or one of its dependencies) logged exceptions to the console. At the first glance JBake still seemed to work. But to be on the save side, I usually run JBake with Java in version 8 [1].
I use the nice little tool jenv, that allows
to switch between different Java JDK versions easily. If you work on many
projects with different Java versions at the same time, you should give jenv
a try,
|
Github Pages
I decided to publish my Blog on Github pages, which are well suited for statically generated sites. In addition, it’s well integrated with git and by that supports well-known workflows.
In my case, I created a personal Github Pages site by defining a repository
named guntherrotsch.github.io. Project-specific Github Pages are also
possible, but could create links/URLs in some cases, which are not so nice.
Please see the
Github Pages documentation
for more information on setting up an appropriate repository.
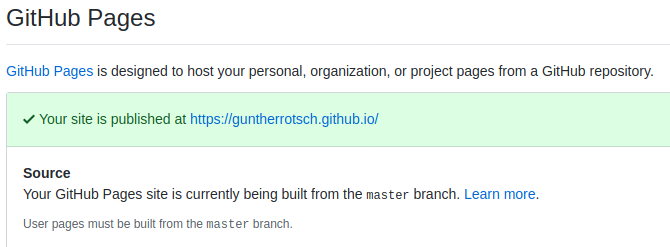
The Github Pages paragraph of the repository settings should after configuration look like:
The content merged to master branch will be automatically published
(with a short delay of max a few minutes).
Starting Blog Project
When setting up my Blog, the goal was to utilize JBake by Maven only. So, I wanted to avoid to install JBake explicitly and let Maven handle the download and integration of JBake artifacts.
The most explanations below apply for the JBake Maven Plugin in general, but some are specific for settings I did for my Blog project. Please see the Maven pom.xml of my Blog project. If you also want to start your Blog with Maven and the JBake plugin, you could even copy the POM and adapt it slightly - very few definitions are specific to my Blog project, eg. group and artifact id.
JBake Maven Plugin
The JBake Maven Plugin is hosted on Github. There you can find some useful information to start its usage.
It also helps a lot, that the plugin follows good practices of Maven
plugin development and provides a help goal:
$ mvn jbake:help # -Ddetail=true -Dgoal=[seed|generate|watch|inline]The jbake:help goal gives general information about other goals of the plugin,
it provides even more information than the Github page of JBake Maven plugin.
The jbake:help called without additional parameters just lists available goals.
In addition, it considers the property System property parameters detail and
goal (commented out above) to give more detailed information about each
plugin’s goal.
Plugin Goals
The most goals of the plugin consider configuration parameters. The most important ones are:
- outputDirectory
-
The directory the goals write the generated output.
- inputDirectory
-
The directory the goals read input from. The input directory defaults for the most goals to
${project.basedir}/src/main/jbake).
The easiest way to setup the Blog project is to fetch samples templates and
content and populate the Blog project folders. This can be achieved with
the jbake:seed goal.
The jbake:seed goal is an exception to the default outputDirectory
parameter, because it populates the input directory. If you don’t like to
modify the pom.xml temporarily for the first initialization step and work
with a copy of my POM, you can overwrite the output directory on the
command-line by defining a Java System property as follows:
$ mvn jbake:seed -DoutputDirectory=./src/main/jbakeBefore we generate the sample static Blog site, you should have a look at the
jbake configuration, which is hosted in
${project.basedir}/src/main/jbake/jbake.properties):
#site.host=https://guntherrotsch.github.io
site.host=http://localhost:8080
render.tags=false
render.sitemap=true
For local testing of the site, I’ve changed the site.host property temporarily
to localhost. JBake uses this parameter to generate the links between the site’s
pages, which is quite important.
Don’t forget to change the site.host to you Github Pages URL before you commit
and push the project files to Github. The commented out first line shows the
definition for my Blog site’s URL.
|
The jbake:generate goal applies the project’s templates to the content files
and generates the static site:
$ mvn jbake:generateMy project POM already defines input and output configuration parameters
properly. If you want to have a look at the generated site you can either serve
it by a local Web server, e.g. by executing python3 -m http.server in the
site’s root folder, or use the jbake:inline goal, that starts JBake’s
internal Web server:
$ mvn jbake:inline [ -Dport=8000 ]The JBake’s internal Web server listens by default on port 8080. If you have
another application occupying port 8080, then the listening port of JBake can
be changed with the port parameter.
The jbake:inline watches for changes of templates and content in the source
folder and re-generates the static site if any modified file is detected.
After refreshing the page in the browser you see the changes without explicitly
generating the static site again, which is very nice for a workflow. So, it’s
worth considering usage of JBake’s internal Web server, even if you are used
to another local Web server.
You can now navigate with your favorite Browser to http://localhost:8080 to
have a look at the sample content. After replacing the samples with your own
content and merging the changed files to master branch of your Blog project,
Github Pages takes automatically care of publishing your site. Congratulations,
your Blog is up and running.
Conclusion
I’m really happy to have selected JBake as static site generator when I started blogging. The Java tooling feels familiar for me and JBake’s features are absolutely satisfying - I appreciate the Asciidoc support in particular.
Also, the combination with the Maven plugin works really well. Till today I haven’t installed JBake CLI and let do Maven the job of managing the required JBake dependencies.
1. Amendment, 18th of February 2020: In the meantime I found out that at least the OrientDB used by Jbake to manage the posts during the build requires Java 8.